


Fire door inspections are the point where every other decision made about a building’s fire doors either gets confirmed or quietly falls apart, and most people doing the checking have never been shown what actually counts as a defect. A fire door inspection checklist exists precisely to catch the gap between a door that looks fine from the corridor and a doorset that’s still doing the job it was originally tested to do.After reading this article you’ll be able to run a genuine inspection yourself, tell the difference between a quick visual check and a full professional survey, and know exactly which defects need reporting the same day rather than logged for whenever someone gets round to it.
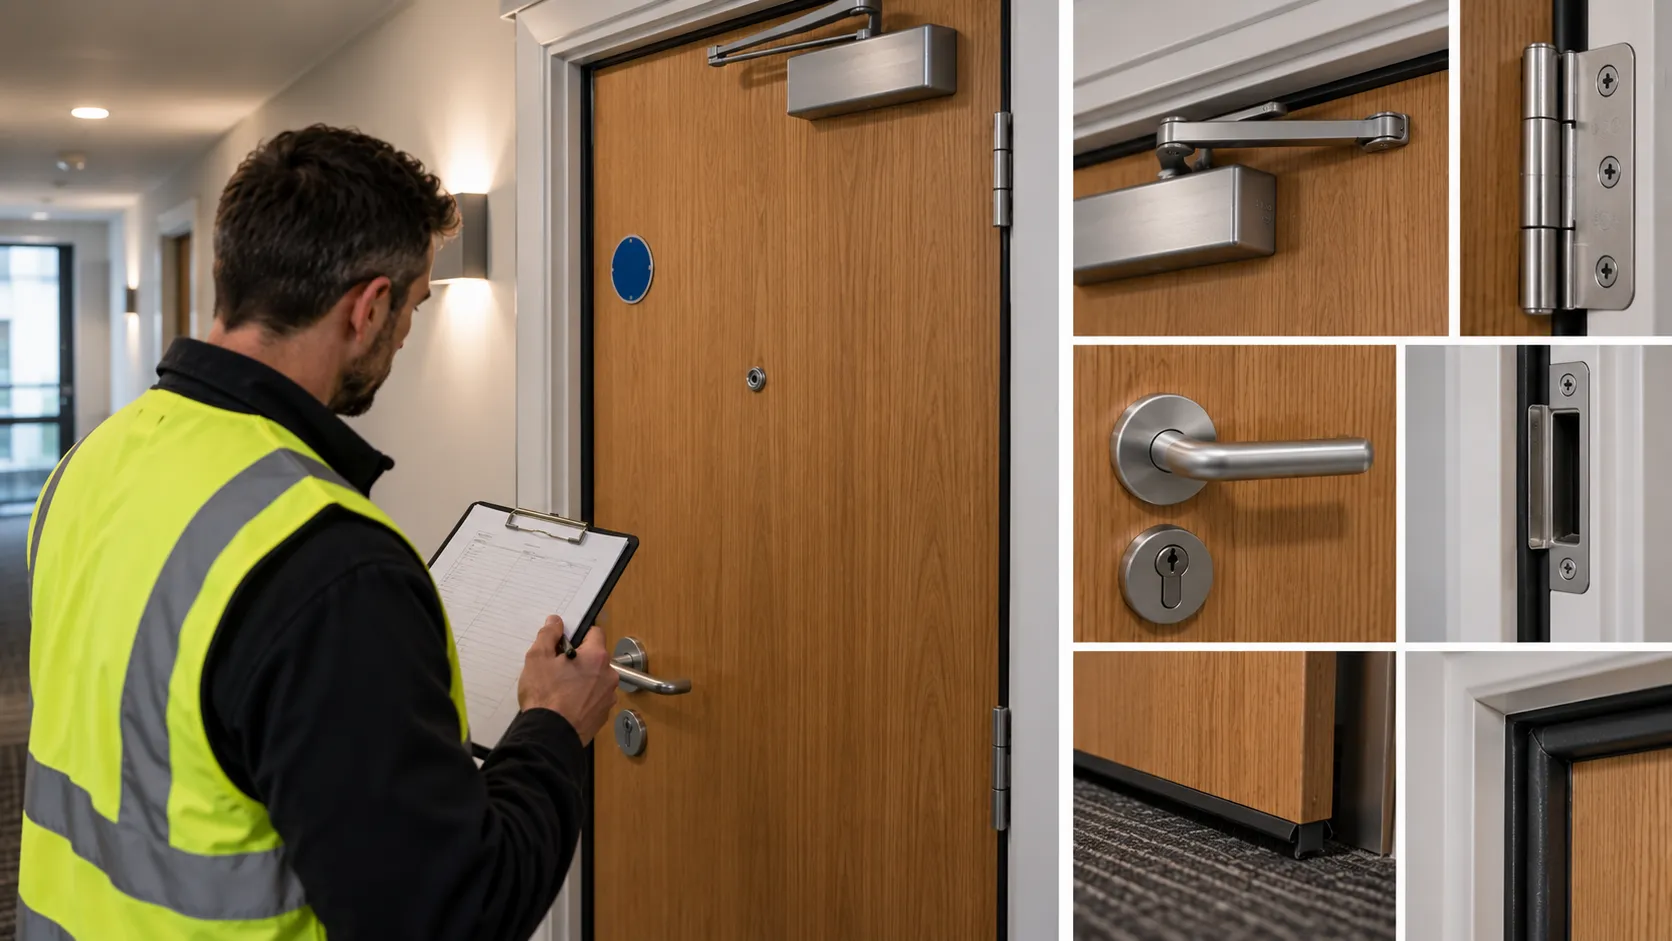
What an inspection is actually checking
A fire door was tested and certified as a complete doorset – leaf, frame, hinges, closer, seals, glazing, all of it together – and an inspection exists to confirm that assembly still matches what was tested, not just that the door swings and shuts. The certification label or plug, usually stamped into the top edge of the leaf, is where every inspection genuinely starts. No label, no reliable way to prove it’s a fire door at all, whatever it looks like from six feet away.
Apertures are where good doors get quietly ruined. Cut a new letterplate, fit a viewer, add a ventilation grille into a certified leaf without checking it against the original test evidence first, and you’ve voided the certification outright – the hole itself doesn’t care how neat the job looks. That’s the single most common way a compliant door on installation day becomes a non-compliant door eighteen months later, and it rarely involves anyone acting in bad faith. It’s usually a maintenance job done in isolation, by someone who never saw the doorset’s test certificate.
The 5 Step Check: what anyone can run today
The British Woodworking Federation built the 5 Step Check as a simple public-facing fire door inspection checklist for exactly the audience who isn’t a trained inspector, and it’s genuinely useful as a first pass rather than a full survey:
- Certification – find the label or plug on the door’s top edge or side; no mark, treat it as unverified.
- Gaps – consistent gaps of roughly 2 to 4mm at the top and sides, no more than 8mm underneath.
- Seals – intumescent strips intact around the door or frame, no damage, no thick paint build-up smothering them.
- Hinges – three or more, firmly fixed, no missing or broken screws.
- Closer – the door closes fully onto the latch from a half-open position, every time, with nothing wedging or propping it open.
Run through in a couple of minutes per door. It won’t catch everything, and it was never designed to – but it catches the defects that show up most often, and it puts the checking in the hands of the people who actually walk past these doors every day, rather than leaving it entirely to an annual visit from somebody else.
Where the 5-Step Check stops, and a full inspection starts
Here’s where most guides stop – and where you should keep going. A registered FDIS inspector runs a considerably deeper fire door inspection checklist than gaps and hinges, because a doorset can pass every item on the public check and still be quietly non-compliant underneath it. Frame fixings get tested for security, not just glanced at. Ironmongery certification gets matched item by item against the doorset’s Declaration of Performance – a hinge or closer that looks right but carries no traceable paperwork is treated as a defect on its own, independent of whether it’s functioning fine today.
Glazing apertures and vision panels get checked for the correct intumescent glazing tape sitting within the beading, not just for cracked or missing glass. Letterplates get checked for the intumescent bag or cowl fitted behind them, sized to the certificate rather than to whatever was on the shelf. The self-closing device gets tested properly too – power size against the door’s actual width and mass, latching speed on the final few degrees, backcheck cushioning the swing before it hits a wall. None of that shows up on a two-minute visual pass, and all of it can fail quietly for months before anyone notices.
A full inspection also has a genuine limit worth naming honestly: it’s still largely non-destructive. An inspector can flag a leaf that sounds hollow where it shouldn’t, or a frame that’s clearly been packed out with the wrong material, but confirming exactly what’s inside a core that’s been on site for twenty years sometimes needs more invasive investigation than any routine inspection is set up to do. A checklist tells you where to look harder. It doesn’t replace looking harder when something genuinely doesn’t add up.
How often should a fire door inspection checklist run?
The Fire Safety (England) Regulations 2022 set the statutory floor for buildings over 11 metres – quarterly checks on communal fire doors, annual checks on flat entrance doors on a best-endeavours basis – and it’s worth being honest that this is a floor, not a target to aim squarely at. Industry practice in most well-run buildings layers weekly visual checks by on-site staff on top of that, monthly operational testing of closers and latches, six-monthly comprehensive inspections by a competent person, and an annual professional assessment by someone FDIS-registered or equivalent. High-risk settings – care homes, hospitals, anywhere with residents who can’t self-evacuate quickly – often need that cadence tightened further, and the fire risk assessment is where that decision actually gets documented rather than assumed.
What to actually bring on an inspection
Most of this needs no specialist kit at all, which is precisely why the 5 Step Check works as a starting point for non-specialists. A pound coin is the standard trade trick for eyeballing gap tolerance – close to 3mm thick, close enough to the 2 to 4mm target that if a gap swallows one with room to spare, it’s already worth flagging. A torch matters more than people expect, because intumescent seal damage and hairline cracking around a frame rarely show up under corridor lighting alone. A phone camera does the rest of the heavy lifting: photograph every certification label, every defect, every gap that looks borderline, because a description written up later from memory is worth far less than a timestamped image taken on the day.
A full FDIS-level inspection adds a feeler gauge for genuine precision rather than a coin-based estimate, a tape measure for confirming door and frame dimensions against the schedule, and occasionally a moisture meter where a timber leaf shows signs of long-term water exposure near a threshold. None of that is exotic equipment. What separates a thorough inspection from a rushed one is rarely the kit in the bag – it’s whether the person holding it actually knows what each reading is supposed to mean.
Records that hold up under Regulation 10
A fire door inspection checklist that isn’t written down might as well not have happened, certainly not from an enforcement officer’s point of view. A defensible record needs the door’s location, the date, what was checked, what was found, and what action was taken — ideally against a doorset schedule or asset register that already lists each door’s original certification and test evidence, so an inspector isn’t starting from nothing every single visit.
Where access to a flat entrance door is refused, that refusal needs documenting too, along with every attempt made to arrange a rearranged visit – that’s the practical meaning behind the best-endeavours wording in Regulation 10, and it’s the difference between a responsible person who tried and one who simply didn’t get round to it. Photographs age well as evidence. Vague notes from six months ago rarely do.
The misconception that costs people money
One thing worth correcting precisely, because it genuinely trips up inspections that should otherwise go smoothly: an older fire door tested under BS 476-22 rather than the newer harmonised BS EN 1634-1 is not automatically non-compliant. The transition away from BS 476-22 runs out to roughly 2029, and in most cases a door that met the standard in force when it was tested, and still closes fully, still holds intact seals, and still shows no damage or unauthorised alterations, remains a valid fire door right now. Treating every BS 476-22 label as a red flag is a misreading of where the industry actually stands – the standard hasn’t failed anyone; it’s simply being phased out on a longer timeline than most people assume.
What actually gets someone prosecuted
A fire door inspection checklist is what turns a vague sense that something’s wrong into an enforceable finding. Enforcement rarely follows from a single missed gap tolerance. It follows from a defect that was flagged and then ignored. Cheshire Fire and Rescue Service inspected a flat in Widnes on 20 May 2021 and told the leaseholder, Adam Berrington, to fix damage and missing fixings on the flat entrance door that put the means of escape at risk. He didn’t. Warrington Magistrates Court fined him £3,924 in August 2024 for breaching the Fire Safety Order – a relatively modest sum as these things go, but the case is a clean illustration of the actual pattern: the door failed an inspection, the fix was straightforward, and the prosecution only happened because nobody acted on what the checklist had already found.
What to do next
Run your fire door inspection checklist – starting with the 5 Step Check – across every fire door you can access this week, and don’t skip the ones that look fine from a distance – that’s exactly where apertures and paperwork gaps tend to hide. Anything flagged, or anything overdue for its documented inspection cycle, goes on the schedule for a full FDIS-level survey rather than a second glance from whoever’s walking past.
Then pull the Declaration of Performance for every door’s hardware against its original test certificate, and put that same cross-check back on your calendar in 30 days – because the gap between what’s on the paperwork and what’s actually installed on site is exactly where the next inspection will look first.